How to use GitMind?
Introduction
GitMind is a mind map tool that is creative yet efficient. With its diversified themes and layout, users can quickly draw out mind maps, org charts, logic structure diagrams, tree diagrams, fishbone diagrams, and more. Also, this tool lets you share your mind maps with as many friends or colleagues as you want and collaborate with them. The mind maps you have created are stored and saved in the cloud automatically, which you can access right inside the web browser on your Windows, Mac OS, or mobile devices anywhere you go. Now please follow the manual guide below to learn how to use GitMind.
Follow us on Social Media:
☆ Instagram: @gitmindmap
☆ Facebook: @gitmind
☆ Twitter: @gitmindmap
☆ Youtube: GitMind Video Tutorial
Register & Login
1.Register & Login
Enter the GitMind official website, click “Login” in the upper right corner. Sign up or sign in to the account in the pop-up page. In addition to email, you can also sign up with Google, Facebook and Apple ID.
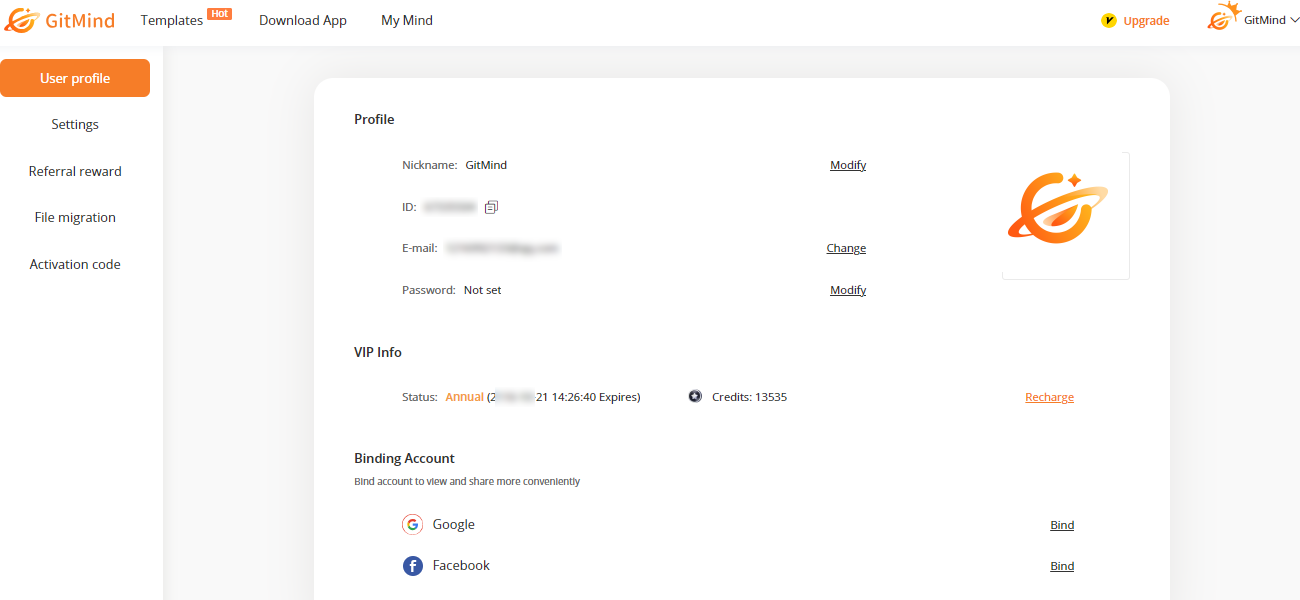
2.My Account
Enter “My Account” in the upper right corner of the official website. You can modify the nickname, bind third-party accounts, and change avatar here.
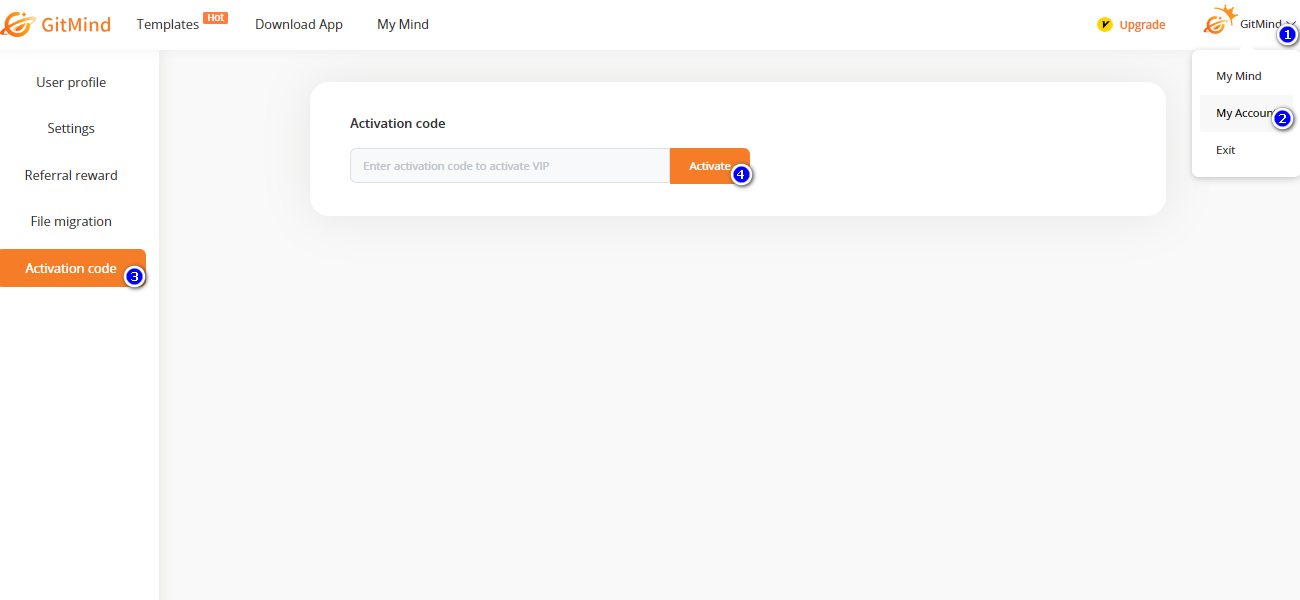
3.Activation Code
In My Account settings, you can find the activation code option. Enter your activation code, and activate the corresponding membership duration or credits.
File Management
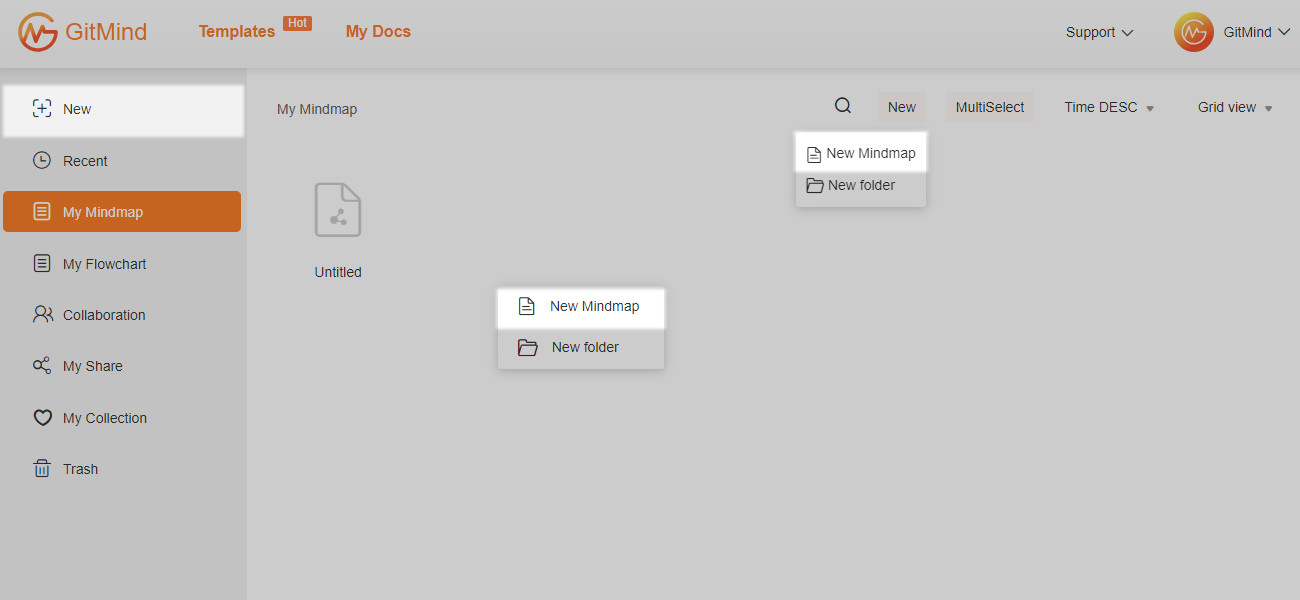
1.Create new
Simply click “New” to create a blank mind map or right click on the blank space to create new blank map.
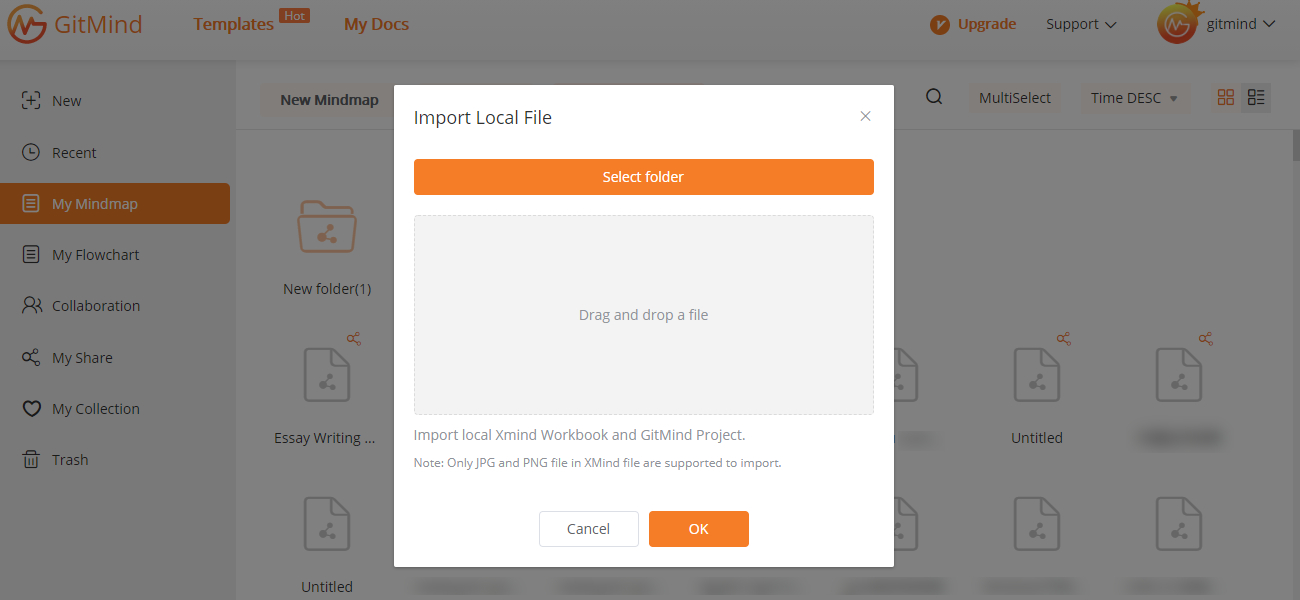
2.Import map
You can click “Import Local File” to import the local GitMind project and XMind Workbook.
3.Rename
Place the mouse on the file, right-click and select “Rename” to rename the file.
4.Move/Copy
Place the mouse on the file, right-click to select “Move to” or “Copy to”, and then select the corresponding directory. You can also drag and drop to move the file.
5.Delete/Recover
Place the mouse on the file, right-click and select “Delete” to delete the file immediately. If you delete a file by mistake, you can find it in the Trash and press “Undo” to recover.
6.Insert map
Open the mind map, right-click at the blank canvas and select “Insert map” option. You can select the file, and drag it to the target position.
7.Split map
Open the mind map, right-click on the branch and press “Split”, the branch will be split and it will generate a new mind map. You can also right-click at the blank canvas and click “More” and select “Split map” option.
Global search
Global search
Global search can help you find the corresponding mind map file quickly by keywords, just enter the keywords in the search field and press the “Enter” key to search.
Use template
Use template
Enter the template gallery, select a mind map template, and click “Use Templates” button.
Edit node
1.Add node
Three ways to add nodes:
1. Select one node first, then press “Tab” key to insert the subnode, press “Enter” to insert sibling node and hit “Shift+Tab” to add parent node.
2. Select one node and then click the icons at the top toolbar to add nodes.
3. Access outline mode and hit “Enter” to add node, “Tab” to insert subnode.
2.Move node
Select the node, drag it to another node. When an orange mark appears near the node, you can release the mouse to finish moving the node.
If you drag node A to node B, node A will automatically become a child node of node B.
In addition, you can also use the shortcut keys “Alt + Up” to move the node up and “Alt + Down” to move the node down.
3.Copy node/branch
You can press “Ctrl+C” to copy the selected node and paste it to another node. You can also select a branch and copy it to another mind map.
4.Floating node
Right-click anywhere and select “Floating node”. You can insert multiple floating nodes in a mind map.
5.Delete node
Select the node and then press “Delete” on the keyboard to delete node. You can also right-click the node and then click “Delete” option.
If you want to delete the selected node and keep its child node, you can select “Delete selected node” or press “Ctrl+Delete” on the keyboard.
6.Change node width
Drag the frame/boarder of the node to adjust the node width for better layout. You can also select multiple nodes and change node width together.
Edit text
1.Partial formatting
Select a node, then click the button at the top toolbar to set the font, font size, font color of the text and fill color of the node. To highlight, you can change the color and add fill color to the target text.
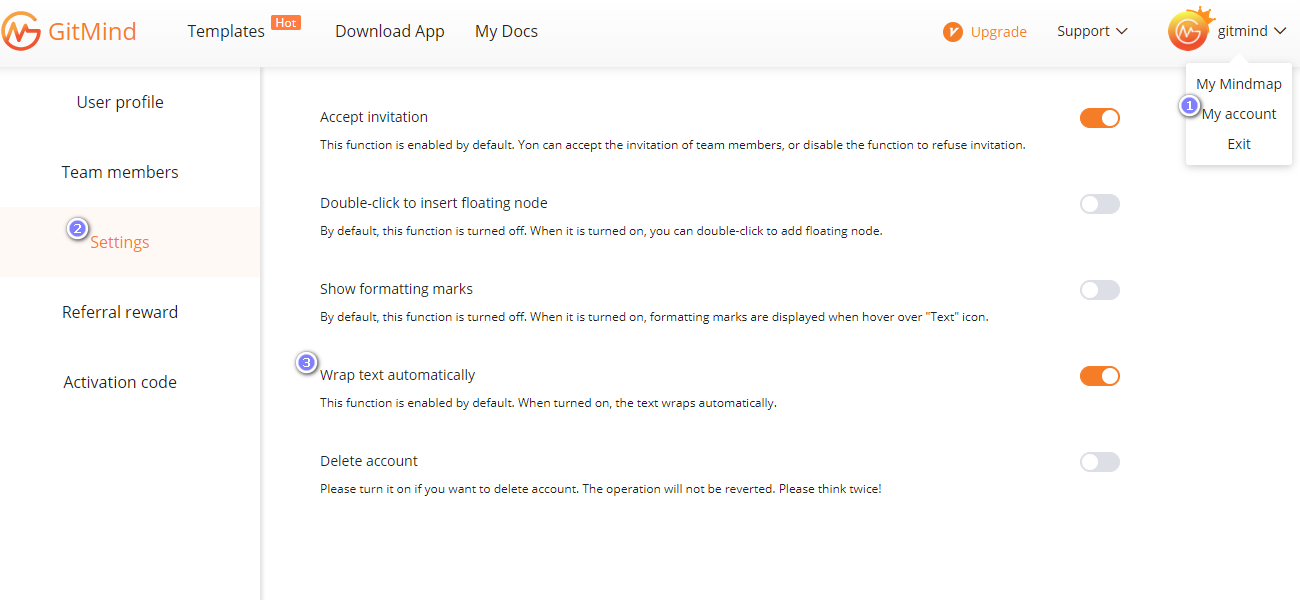
2.Wrap text
If the text is too long and manual line wrapping affects editing efficiency, you can turn on automatic line wrapping.
Operation method: Log in and click “My account” in the upper right corner. Find “Settings”, and enable automatic line wrapping.
3.Find & Replace
Open the mind map, right-click on the blank canvas and click “Find & Replace” option. You can also tab “Ctrl+F” to access the function.
Custom theme
1.Change theme
After creating a new blank map, there will be a theme by default. If you want to change the theme, you just need to hit the magic wand icon on the top toolbar to apply a random theme. You can also click the Style button at the upper right corner and select from built-in themes.
2.Pin theme
Open the mind map, click the Style button at the right corner. Select “Theme” option. Pick the theme you like, click “…” button and pin it to top. You can pin up to 6 themes to top.
3.Set default theme
Open the mind map, click the Style button at the right corner. Select “Theme” option. Pick the theme you like, click “…” button and set it as the default theme. Then every time you create new map, it will begin with the default theme.
Change background
Change background
You can click the Style button at the upper right corner, pick a solid color background or apply built-in backgrounds.
Custom background
If you cannot find preferred backgrounds in our Pop category, simply select “Custom” under “Theme” – “Background”, and upload your own images to set as background.
Change layout
1.Change layout
Click Style button at the upper right corner and select “Layout” option. You can change it to Mind Map, Logic Chart, Tree Chart, Org Chart and Fishbone according to the actual need.
2.Change branch layout
You can also change the certain branch structure. Click Style button at the upper right corner and select the target branch. Choose “Style” option and then select the structure.
Customize style
1.Customize style
If you are not satisfied with built-in themes, you can customize by yourself. Please access “Style” at the right toolbar. You can customize node spacing, background color, line, border, shape here.
2.Multi-branch color
If you want to customize the branch color in a short time, we also provide several series of branch color here.
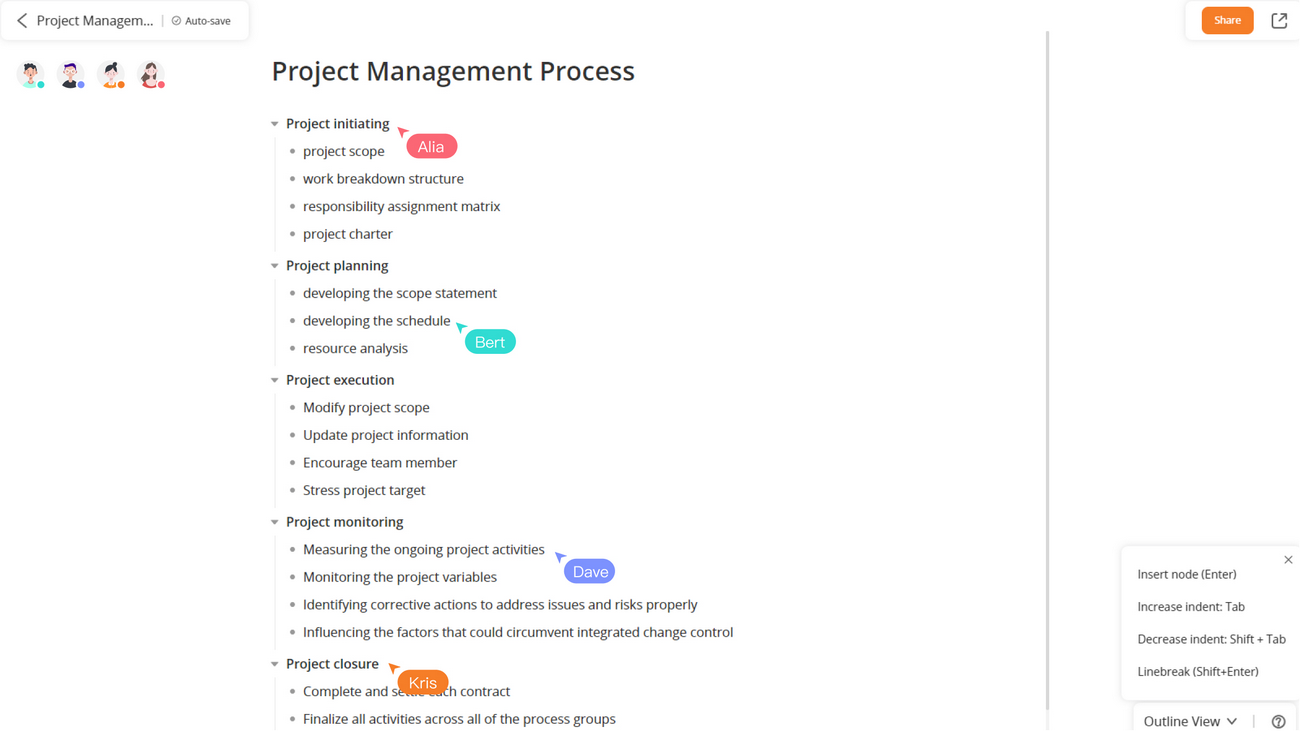
Outline mode
Edit outline
You can edit, view, export and collaborate on the whole map in the outline mode.
Hit “Enter” to add a node. Press “Shift+Enter” to wrap text. If you want to add a subnode, press “Enter” and then “Tab” to increase indent.
Share outline
If you want to share the outline with others, you can click the “Share” button at the upper right corner and choose “Anyone with the link can view” option.
If you want to set a password, you can click Share settings, and generate a random password. Of course, you can also select “Anyone with link can save” option.
If you want to close share, you can select “Link sharing off” option. Then others cannot view this file any longer.
Outline collaboration
Then other team members open the file and can edit on the same outline together. If someone is editing on a line, you can find his/her account name beside the line. If he/she finishes editing and does not select the line, the account name will disappear.
Insert icon
Insert icon
Please select the target node and then click “Icon” at the right toolbar. To remove the certain icon, select it and then click “Remove” option.
![]()
Insert sticker
1.Insert sticker
Open a mind map, and select a node. Click “Style” at the right corner, select “Icon” option, and then choose “Sticker”. There are various stickers for you to choose. You can adjust the sticker size and position.
Insert link
1.Insert link
After selecting a node, you can click “Insert” option at the upper toolbar and input a link.
2.Link recognition
After pasting a link in the node, it automatically recognizes the link you input and inserts the link.
3.Insert RecCloud video
For any videos uploaded on RecCloud, you can copy and paste the video link into the mind map, and play it directly from the mind map or under slide show mode.
Insert image
1.Insert image
After selecting a node, you can choose to insert image. You can drag and drop to adjust the image size. Right click on the image to remove the image.
2.Adjust image position
After inserting an image, you can drag and drop to adjust the image position. The image can be placed above, below, or beside the text.
Insert note
Insert note
After selecting a node, you can choose to insert note.
Insert equation
1.Insert equation
If you want to insert a formula, you can click “Insert” on the top toolbar. Find the formula on the right side of the formula list and press the send button to input.
2.Search equation
If you can’t find the formula you need in the formula list, you can go to the Common Formulas article. Copy the Latex code into the formula input box, and press the send button to enter it. If you still can’t find the formula or symbol you need, you can drop us an email to [email protected].

Relationship
1.Add relationship
To connect two nodes, please select one node and click “Insert” at the top toolbar. After selecting the other node, there will be a relation line. You can drag the yellow bars to adjust the position and click “Delete” button on the keyboard to delete. Press “Space” to edit text on the relationship.
2.Edit relationship
Drag the start knot and end knot to adjust the relationship position.
Summary
1.Add summary
You can summarize multiple nodes under the same branch.
2.Edit summary range
Choose the summary, and drag the yellow borders of the frame.
3.Customize summary style
Select the summary, then customize the line color, line style and fill color of the summary. You can also customize the child node style.

Watermark
1.Add watermark
GitMind supports adding watermarks to your mind maps. Open the mind map, click on the right toolbar, select “Theme”, select “Background”, check “Insert watermark”, enter the text watermark, set the watermark color, direction, watermark transparency, etc.
After adding a watermark, if you share the file with others, they will see the watermark when they open it.

Comment
1.Add comment
Click the node you want to comment, and then click the comment icon that appears at the upper right corner to enter the comment. Click “Show all comments” to view all comments.
2.Close comment
To close the comments, you can click “More” option at the upper right corner and click “Show comments” switch button.
Format painter
Format painter
Select a node, click “Format Painter”, and then select another node, all formats of the first node will be copied to the second node.
Split screen
Split screen
GitMind supports split-screen mode. You can upload your own local files (pdf/doc/docx format) or open a web page. After the upload is successful, you can create your own mind map while reading.
Open the mind map file, click Split Screen Mode in the lower right corner, and select Upload File or Open Web Page. Then you can read and make a mind map at the same time.
Slide show
Slide show mode
Open the mind map, click the slide show option on the upper toolbar. Then your mind map will be converted to slide show and click to go to the next slide. Right-click on the slide to skip to the end of slides or exit presentation.
Slide show background
In slide show mode, right-click to select “Change background” and you can switch between different mind map backgrounds.
GitMind AI
GitMind AI bot
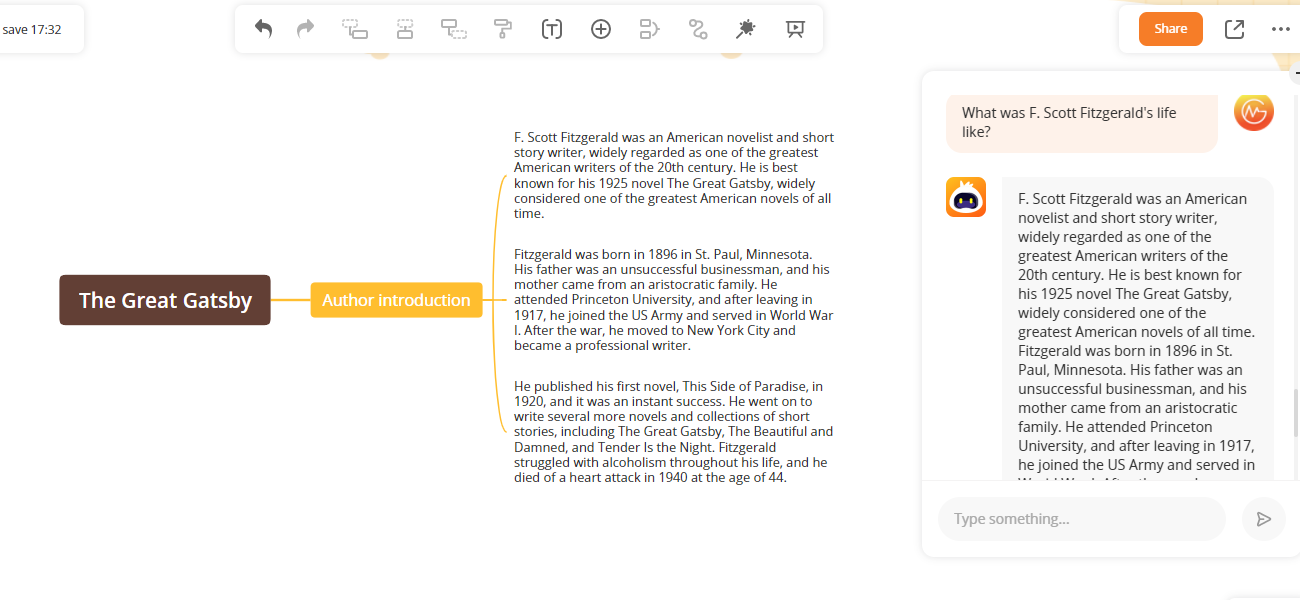
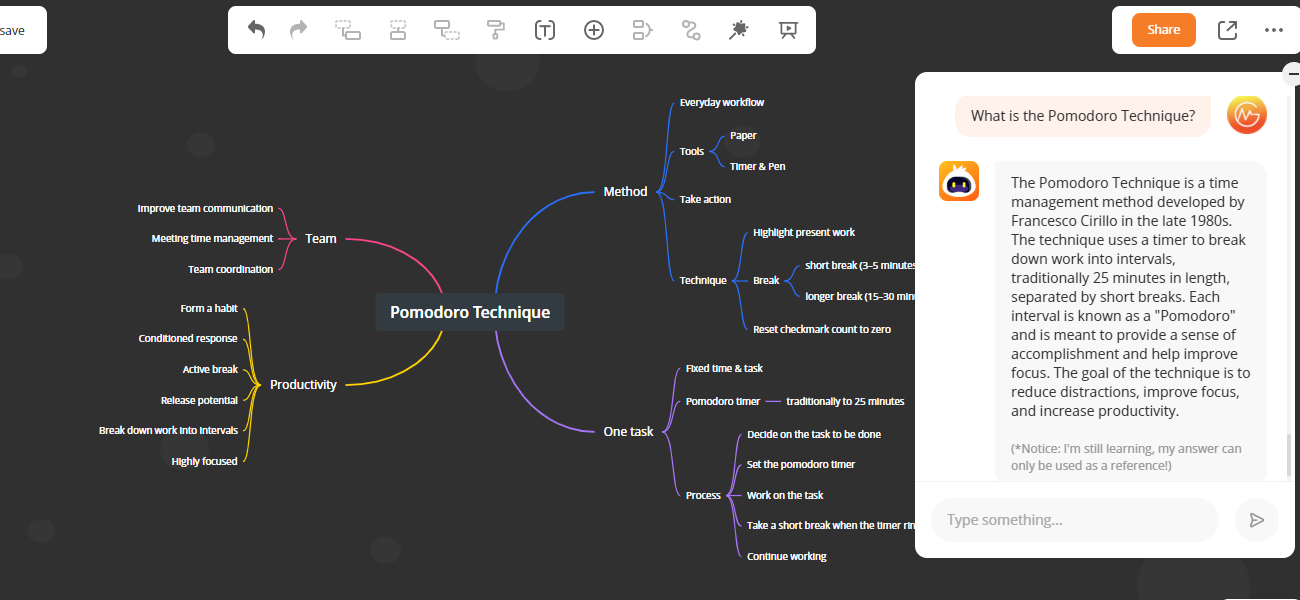
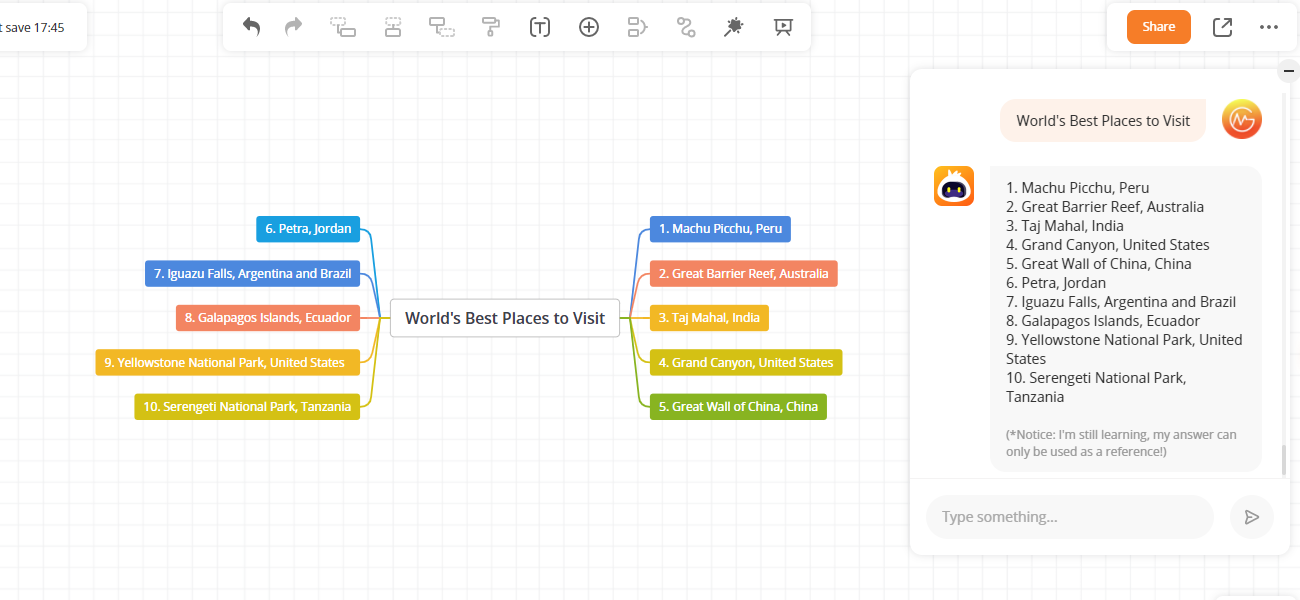
GitMind AI bot is a great feature in GitMind AI. You can find the bot’s avatar on the right side of the editing page and click on it to use it. The GitMind AI bot is an intelligent conversational bot, you can ask it any question and it will quickly answer in context. So when inspiration runs out, let it help you out!
Ask GitMind AI question
GitMind launches an AI bot. Easily create mind maps by copying answers with one click. Open the GitMind web version, create a mind map, and you can see the AI bot on the right side of the screen. When you hover over it, it pops up. And when you click on it, a dialog box opens up and you can talk directly in the dialog box.
Copy into mind map
After asking a question, you can click the Copy button at the bottom right corner of the answer. Select a node, press “Ctrl+V” on the keyboard to generate a mind map.
GitMind AI use cases
How can GitMind AI help you?
1. Help with mind mapping.
2. Improve the efficiency of information collection.
3. Inspire you during the brainstorming process.

4. Help decision-making with the help of algorithms.
AI Mind Mapping
AI Mind Mapping includes two functions, prompt to mind map and AI summary. Both functions can help you quickly get a complete mind map.
Prompt to Mind Map
All you need to do is enter a prompt in the box and click “Generate” button. If you have no idea about prompts, you can refer to the prompt examples.
File to Mind Map
GitMind also provides an AI feature that automatically analyzes the content of your document and generates a mind map for you. Simply upload a PDF/DOC/PPTX document, click “Generate”, and it will automatically generate a mind map.
AI Brainstorming
Select any node in the mind map and click the AI button on the top toolbar to ask questions, get answers, and generate the corresponding mind map in one click!
Image to Mind Map
Click the AI button on the upper toolbar, you can choose Image to Mind Map option. Upload the picture, wait a moment to recognize the content and generate a mind map.
Focus mode
Focus mode
Open the mind map, click the “More” option in the upper right corner and select “Focus” function. If you need to exit the focus mode, press the “Esc” key or click “Exit” on the upper right corner.
Share & Collaborate
1.Share
If you want to share the mind map with others, you can click the “Share” button at the upper right corner and choose “Anyone with the link can view” option.
If you want to set a password, you can click Share settings, and generate a random password. Of course, you can also select “Anyone with link can save” option.
If you want to close share, you can select “Link sharing off” option. Then others cannot view this file any longer.

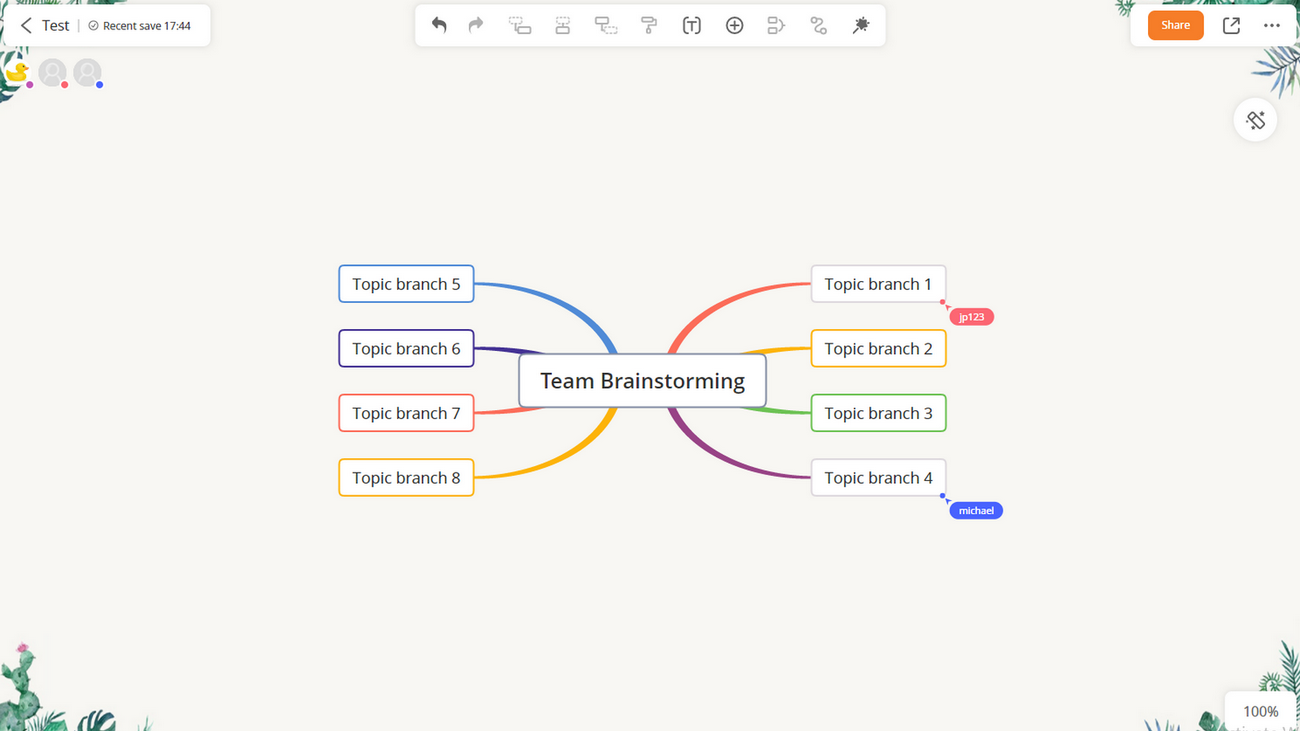
2.Collaborate
GitMind endows you with the ability to make a mind map in a team.
Step 1: Click the “Share” button at the upper right corner and choose “Anyone with the link can edit” option.
Step 2: Then other team members open the file and can edit on the same mind map together. If someone is editing on a node, you can find his/her account name beside the node. If he/she finishes editing and does not select the node, the account name will disappear.
My planet
Create planet
GitMind supports creating planets, which can be used by teams and individuals to build knowledge bases. You can create a planet by selecting “My Planet” and clicking “New planet”.
Free accounts can only create 1 planet, pro accounts can create up to 5 planets.
Manage planet
After creating, you can rename your planet, allow members to comment, allow members to create new files, and destroy the planet. Hover your mouse over the planet and click “…” to select the corresponding option.
Invite member
After creating, you can invite other people to join your planet. Click “Invite member”, copy the invitation link and send it to others.
Members who joined the planet can view all the files in the planet, and can also create new mind maps, flowcharts or invite others to join the planet.
Manage member
When others join the planet you created, you can manage the members of the planet. Click “Planet member”, find the corresponding member, and change the member’s permissions.
You can change the member’s permission to “View only”, “Can edit”, “Can view/save”, etc. You can also set the member as a planet administrator, or move the member out of the planet.
History map
History map
If you want to restore the history version of your map, you can right-click on the blank canvas and select “Version History”.
Input the map name and then select a version to preview and restore.

Export
Export
Click “Export” to export the mind map as image, PDF, text, word document and GitMind project.
File migration
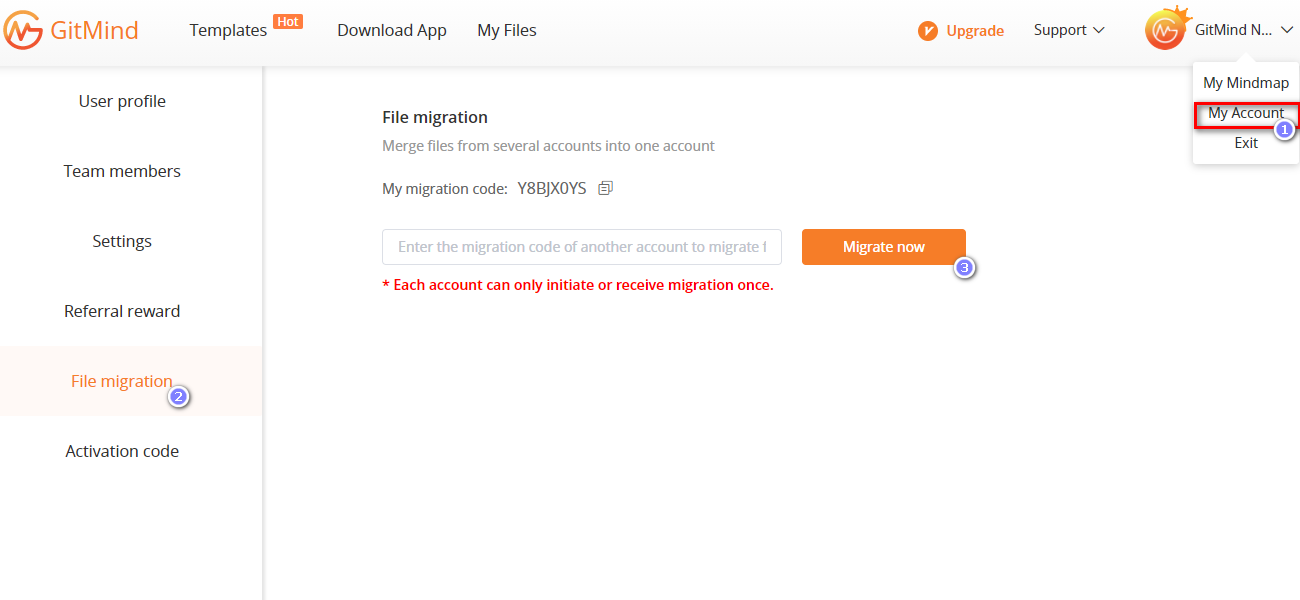
File migration
If you create multiple GitMind accounts and want to merge all files to one account, you can go to “My account” and “File migration” section.
Input the migration code of the other account. Then the files in the other account will be migrated to this account. Of course, the VIP status will also be migrated to this account.
You can find the migrated filed in the certain folder in the “My Files” section.
Contact us
Contact us
Please refer to the manual guide of GitMind as above, if you have any questions in using the service or have any other suggestions, please contact our support center.
Leave a Comment
Comment (246)